Build #4: DZ60 1965
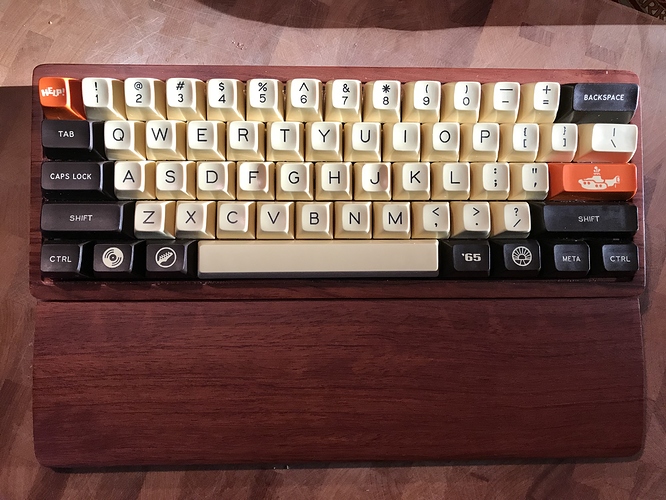
When I first saw the SA 1965 set, I fell in love with the colorway immediately - particularly the cream colored alphas and the old school orange. But something about the photo bothered me, and I couldn’t quite place it at first. Beatles? Fine. Les Paul back there in the corner? Check. Tweed amp? Sure. Keyboard case? Aluminum. Wait, what? There’s the problem. CNC milled aluminum is a few decades too early for the vibe this set intends to deliver. But what is the right backdrop for this set?
My first thought was a wooden case, to evoke the feeling of that old turntable your grandma used to use (arguably that was more 40’s and 50’s than 60’s, but just roll with me for a bit). Wood always brings warmth and a natural feel to the proceedings, whatever the proceedings are. Here, a more reddish wood would be just the thing to accent those orange caps.
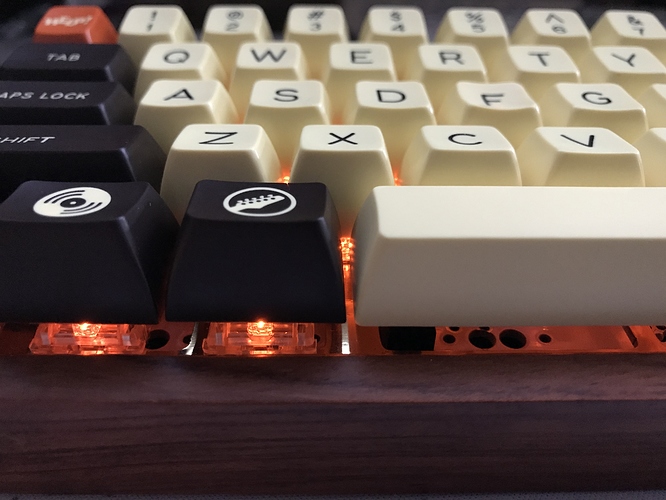
But there’s something else. If you’ve ever played electric guitar or bass through an old tube amplifier, cranked up, then you can’t help but notice that warm orange glow radiating from the filaments. Vintage, nostalgia, whatever you want to call it - to me, that oversaturated tube glow means a good time. It seems to me that with underglow and the correct LEDs, we ought to be able bring that good time vibe to this board. And with the DZ60, we have the option of a brass plate, which is right on point for the colorway. Perfect!
In build #3, I learned that the non-standard layout bugged me, so for this one, we’re going back to the standard ANSI layout. That means a 2.25u Lshift, which for the DZ60 R2 means plate B. We’re also going to go back to 67g Zealios, after a couple of tries with the 62s - for the moment, that’s where my feelios live.
This build went pretty smoothly from stab mods through switch mounting to soldering, up until the point I did the per-key orange LEDs. I thought I had seated all of the LEDs in the switches, and so I tested the PCB, mounted the plate/PCB assembly in the case, and began installing keycaps, at which point I noticed the problem. One LED had slipped out of its notch in the switch, and was about 0.2" higher than it should have been, just enough to prevent the keycap from fitting properly. Unfortunately, at this stage of the build, there was no choice but to remove the plate/PCB from the board, desolder the LED, remount it, resolder, and remount the plate/PCB in the case. So it goes.
My first impressions were pretty positive - as I’ve noticed in my previous builds, those SA caps just yield a nice satisfying sound, and the look of this build is basically what I was after. But as I work with the board for a while, I notice some pinging. At first I wanted to blame the stabs, which are rapidly becoming my least favorite part of every build, until I realized that the sound could also be created with the alphas. Since it occurs on bottom-out, I assume it’s originating from the brass plate, and while I’m not certain that it isn’t switch spring noise, I would have thought that noise would be audible before bottom-out. So, time to explore case dampening.
A sorbothane interlude
Sorbothane! First time working with this material, and I’m a little unclear on exactly how to use it in a build, but as with all of my other builds so far, it’s about learning by doing. I begin by cutting a piece of cardboard in the shape and dimensions of the bottom of the wood case, to use as a template for cutting the sorbothane sheet. I originally thought I would use a drill to cut holes in the sheet for clearance for the PCB screw mounts, but due to the squishy plasticity of sorbothane, that was about as useful as a urinal in a convent. On to plan B: cut rectangular strips in from the edge to the screw mounts, and then cut enough of each strip away to leave room for the mount, manually putting the strip back in place, kind of like a black Mondrian jigsaw puzzle.
Not pretty, but maybe enough to get the job done?
As it turns out, not really, and I think that’s because I didn’t entirely understand the point of using sorbothane. If you read up on sorbothane, you find that successful installs in industrial machining applications and audio-sensitive environments revolve around allowing the sorbothane to make contact with the noise-making (vibrating) element and absorb its vibrations, essentially converting that mechanical energy to a very small amount of heat, rather than converting it to vibrations in the air.
My sorbothane sheets were 0.1" thick, but the distance from the bottom of this wooden case to the underside of the mounted PCB was roughly twice that, so no direct contact with the sorbothane was being made. If the handwaving analysis above is correct, this means that little mechanical energy from the switches/plate/PCB is being absorbed by the sheet, and hence very little sound is being attenuated. What to try now?
- One strategy would be to try some other material. But I didn’t want to do that; sorbothane is dense, and a nice side effect of putting a sheet in the case is that the whole board now has a pleasant heft.
- A second strategy would be to put in another layer of sorbothane, stacking until contact is made with the underside of the PCB. While this is doable, it will start to get expensive fairly rapidly.
- A third option would be to cut small squares from the leftovers of the sheet I used for this build, and then put these little squares between the full sorbothane sheet at the bottom of the case and the PCB, with the idea of giving those noise-making vibrations a way to disperse through these squares into the sheet underneath.
I gave option #3 a go, and while the difference wasn’t huge, this did actually have some effect on the sound; while the pinging is still noticeable, I had to hold the board up to my ear while pressing keys to detect it clearly. More experimentation is needed, but I feel that there has to be a better way to deploy this material cost-effectively. I’m particularly intrigued by the idea of putting a laser-cut sheet of sorbothane between the
PCB and plate - again, if the analysis above pans out, then this should be a very effective way to squash the high-frequency vibrational transients (i.e., pings). Very interested to see where this IC/GB goes…
Lessons learned
- Best practices: always double-check LED positioning before soldering!
- I had DSA Penumbra on this board for a while before SA 1965 arrived, and once again, SA caps yield a much more satisfying sound than DSA to my ears. Give me the thunk.
- The SA 1965 spacebar was slipping off of the stabilizer stems, but the solution turned out to be easy: place a tiny little square of scotch tape on the top of each stab stem, then push spacebar down into place. That little bit of tape provides enough material between the stab stem and the keycap to keep it firmly together.
- Sorbothane needs more experimentation to determine how to best deploy it for sonic reduction.
- I do like the additional weight that the sorbothane is adding. Heft is good.
And oh, yes, crank up your tubes.
Specifications
case: rosewood 60% case
PCB: DZ60 R2, brass Plate-B (2.25u Lshift)
LEDs: per-key orange
switches: R11 67g Zealios
switch lubing: N/A
layout: ANSI
keycaps: SA 1965
stabilizers: OEM
stabilizer mods: clipped and lubed with Permatex Dielectric Grease
case dampening: Sorbothane 0.1" sheet, 50 duro;
    1 full layer at base, 8 small squares between that layer and PCB
HxWxD (without caps): 1.25"x12"x4.5"
HxWxD (with caps): 2"x12"x4.5"
assembled weight (board only): 2.15 lbs
assembled weight (board + wrist rest): 2.90 lbs

