Got My Apple Extended Keyboard II Working

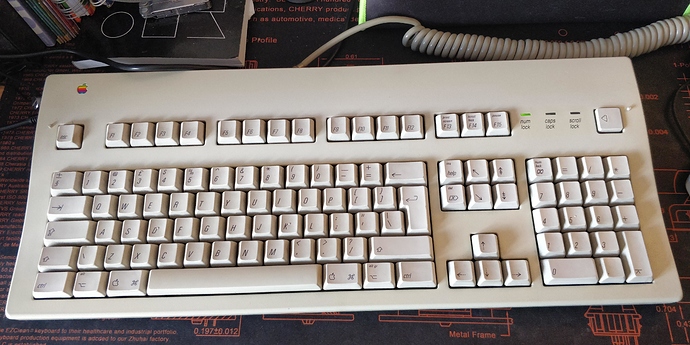
I bought myself an AEK II a little while ago. I have a thing for the later “vintage” keyboards that have mechanical switches but more modern layouts, so this one would make a fine addition to my collection.

Still needs a clean and probably a retrobrite.

Between the mid 80’s and late 90’s Apple peripherals used the Apple Desktop Bus protocol and in order to use them on modern hardware must be converted to USB. So you have 3 choices, a Griffin iMate (not made any more, but occasionally pop up second hand), one of Hasu’s pre-made TMK converters, or build your own using a ATMega32U4/2 microcontroller.

I am a cheap skate, and love and excuse to tinker so I chose to do the latter.

The process was surprisingly simple. I used the guides from Hasu on Geekhack and scottc on Deskthority.

Bought a cheap s-video extension cable (for the female plug) and an arduino pro micro.

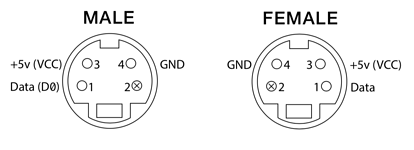
Once they arrived I stripped the extension cable tested the plug and cables with a multimeter to find out which wires I needed as per this diagram:

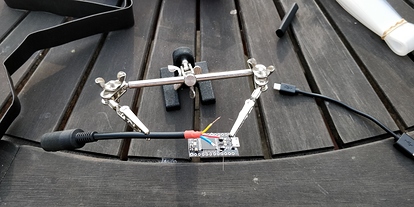
Set myself up outside (weather was nice and I don’t have a fume extractor)

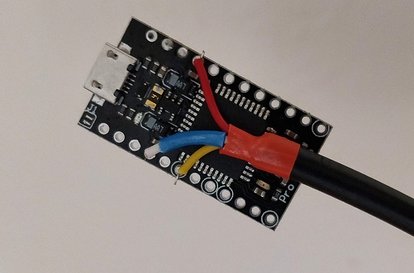
Soldered what I had determined to be the correct wires to the pro micros VCC, GND and PD0 (labelled “3” on a pro micro).

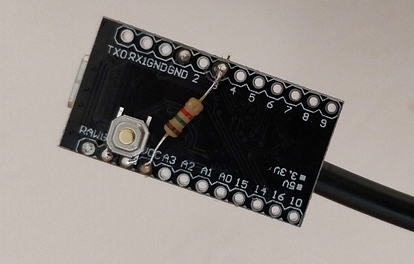
and put a 1.5k Ohm “pull up” resistor between data and VCC and a momentary SMD switch between ground and reset (optional, just there to make resetting it easier).

I later realised I had written down the wrong wires, and had to swap the red and yellow ones, so it doesn’t look quite as neat now, luckily heat shrink hides a multitude of sins, I also added a cable tie for strain relief.

Then I used the TMK online editor to create a hex file. The only changes I made from the default were swapping the grave key and the backslash/pipe key, setting the apple specific reset button to open the calculator (might change this later) and changing the numpad equals to a regular equals (as it does not seem to work properly on windows).

I originally tried the rev.2 firmware, but it would not play nicely, and my computer would not recognise the new device. Rev.1 worked perfectly fine. I have been informed by Laser at Deskthority (and it states it clearly in the Hasu thread at Geekhack that rev.2 is for atmega32u2 devices like Hasu’s newer controllers. So use rev.1 with a Pro Micro.

To flash the firmware onto the Pro Micro, you can use QMK Toolbox

Download and install the latest QMK driver package.

Download and run the latest version of QMK Toolbox

In the GUI select your .hex as the local file, and set the microcontroller to ATmega32u4.

Then connect the pro micro to your computer, and either tick the “auto-flash” checkbox and enter bootloader mode, or enter bootloader mode and press the “Flash” button shortly afterwards.

Bootloader mode is entered by briefly connecting the reset and ground pins on the pro micro (or pressing the switch if you added one earlier)

Old method for flashing using WinAVR:

Download and install WinAVR.

Connect the pro micro to your computer and open up device manager. Get the pro micro into bootloader mode by briefly connecting the reset and ground pins (or pressing the switch if you added one earlier). In bootloader mode the pro micro will appear like this in device manager.

image

It will only stay in bootloader mode for about 8 seconds. Make a note of the port shown (in my case “COM4”) when it is in bootloader mode.

Open a command prompt and navigate to the folder that contains your hex file. Put the pro micro in bootloader mode, and while it is still in bootloader mode run the following in the command prompt.

avrdude -p atmega32u4 -P YOUR_SERIAL_PORT -c avr109 -U flash:w:filename.hex

Obviously replacing YOUR_SERIAL_PORT with the port you noted earlier, and filename.hex with the name of the hex file you downloaded.

For me, this line looked like this:

avrdude -p atmega32u4 -P COM4 -c avr109 -U flash:w:adbusb.hex

And if it ran correctly it should look a little something like this:

Once that’s done, plug your keyboard into the converter (in my case with another s-video cable) and type away.

This whole post was typed on the AEK II. So far I am really enjoying it. I love the locking caps lock key and the massive adjustable angle leg slider thing. The only thing I don’t like about it so far is the thin enter!
13 Likes

Good stuff :slight_smile: going to do the same for my M0118. Alps in their original Apple cases sounds amazing

I’m glad you posted this as I have an Apple adjustable coming to me soon. I was worried I was going to have to get a teensy 2 and use Soarer’s converter stuff to get it working. Now I know that the TMK editor has an ADB to usb converter. :slight_smile:

1 Like

Nice work! AEK IIs are fantastic keyboards.

1 Like

Apple Extended Keyboard II is very pretty.
nice work!!! :fox_face:

1 Like

Teensys were crazy expensive for a bit, I have a couple stockpiled for if I ever want to do a handwire or similar. When I came to buy bits for the converter though I paid about £5 to get the pro micro delivered quickly from within the UK, but I managed to find someone on ebay selling Teensy 2.0s for only about £7.

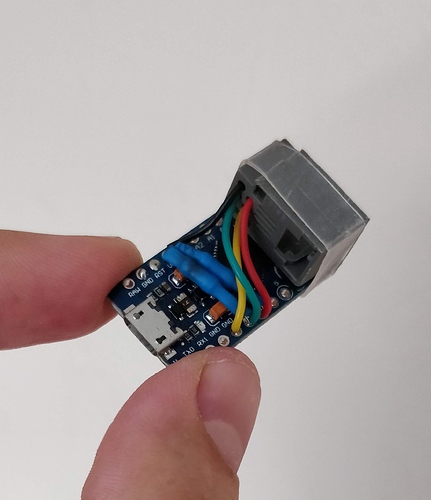
Pro micros are still about £3 from china, used to be even less. But if you want an even smaller converter you might want to look at a DFRobot Beetle, a Pro Micro SS, or a DM Micro Beetle. Process for using them should be the same, I have a couple coming from China and might use one to make a converter for my M0110 so I’ll let you know if there are any considerations.

Great guide, puts info that was scattered across a couple site into one neat & easy to discern post, thanks for putting this up! :metal:

Thanks, that’s what I figured, it’s not difficult once you have all the info together, but getting that info plus some of the trial and error made me figure it was probably worth putting in one place (partially because I did this before a couple years ago for a Wyse PCE and I completely forgot how I did it)

1 Like

Yeah, right about when I had gotten into doing more custom/hand wired stuff is when the teensy’s were higher. I think right about when the 3 or 3 plus or whatever came out. But I am glad you can use a pro micro. I’ve used them for four different boards now, and they are fairly small footprint and inexpensive. I like them for those reasons. Plus a lot of people have used them or have made them pin compatible.

I really like that I can make an ADB to usb converter most though. My PCXT has a small mod on the case to be able to have one built in,but it wouldn’t be that difficult to return it to mostly original. (can’t undo the outer case mods, unfortunately, but I don’t mind and don’t plan on getting rid of it soon.) I’m mostly glad I don’t have to figure out the matrix and hand wire it in that way.

Built an M0110a converter for my other Apple keyboard following the steps in this guide and the pinout on the guide by Hasu.

Works great, the only difference is that it needs 2 pull-up resistors (one for clock, one for data)

I know that this is a long time to resurrect this thread, but I wanted to say that today I finally got a chance to take a pro Micro and make an ADB adaptor. This is awesome! I am typing now on one of my ADB keyboards, and hope to have the other one fixed soon.

@Gouty this has been a great intro ad I’m glad that you put it up and made it 100% easy to understand. Between you and Hasu, I was able to do this quickly and easily.

Nice! Was it hard to make the adapter work with the pro micro? I used a teensy since I had that on hand but it felt like massive overkill given the price difference between them and the amount of ports required.

It really wasn’t. There are only three pins needed on the pro micro. I had a slightly different version than Gouty originally used, but luckily it had the same pinout (as everything sold as pro micro should) and it’s just the resistor (I used a 10k resistor as that’s what I had laying around) and it just seems to work. I did have to flash it a couple of times to get the right firmware to react to all of the keys and in a way that I wanted it to. The link for that is in the Hasu link on GH that’s in the original post here.

So far, it’s fine for typing, but I probably won’t use it for gaming. It doesn’t seem to have much in key roll-over. I don’t type super fast, but when I was playing games it seemed to not always register a keypress. I suspect it would be 2 or 3 KRO, which doesn’t always cut it for me in games. But I have plenty of other keyboards for that. :smiley:

I ended up using an ADB cable that I had from an old ADB mouse whose condition was unknown, so it plugs directly into the keyboard that I have. My other ADB board also has the female connection on the board, so hopefully I can transfer the keymap over and not have too many issues or be able to account for differences without affecting this one’s keymap. Time will tell as I need to clean and refurb my other one.

Good job! I’m really glad to hear it has been of use. Let me know if you have any suggestions for changes to the guide.

Your guide is really good. After re-reading it, all the info was there up until the winAVR part.

Since the TMK editor downloads a .hex directly, you can use QMK toolbox to flash the pro micro. It’s what I’m most familiar with and what I like to use for flashing Atmega based controllers. The auto-flash function in QMK toolbox helps out a lot. You don’t have to worry about clicking enter or activating the flash during the 8 seconds of the pro micro bootloader mode, it flashes as soon as it sees it in bootloader mode.

Thanks for the feedback! I’ve made the suggested changes

I posted an issue I had with my Apple Adjustable and the converter on geekhack, but I’m going to post the highlights here if anyone has issues in the future.

For some reason, when the Apple Adjustable is plugged in on Linux, the mute button seems to be held down and seems to make any typing across all keyboards attached to the system stop working.

This might be due to some damage I might have inadvertently caused when I replaced those microswitches on the side.

The remedy for my board for this seems to be to actuate the vol up or vol down buttons. After that, it seems to not have any issues, or at least not so far.

In the future, I might get back into it and remove the switch and see if that helps. It will depend on how I feel about it and how often it is actually an issue when it is left plugged in.

**edit: The mute button seems to not work once the issue is resolved. So I believe that it is likely that there is an issue with the pcb or the switch. I might get into it and trace the problem down in the future, but it works enough for my purposes as is so it won’t be for a while.

Hey, just wanted to say that this thread helped me finish my adb converter. in the end it was easier than I thought, but I had issues with the .hex that I made, so it didn’t show up at all.
Also, I changed the bootloader and I thought at first I fried the pro micro, but everything’s ok now.

2 Likes

Hey, glad to hear it was useful! the ATMega32u4 on the Pro Micro is pretty hardy and hard to completely bork! If in doubt do a proper reset and re-flash it with a known working .hex.

I built a converter myself last week for a Model F XT (something I’ve wanted for years!)

1 Like